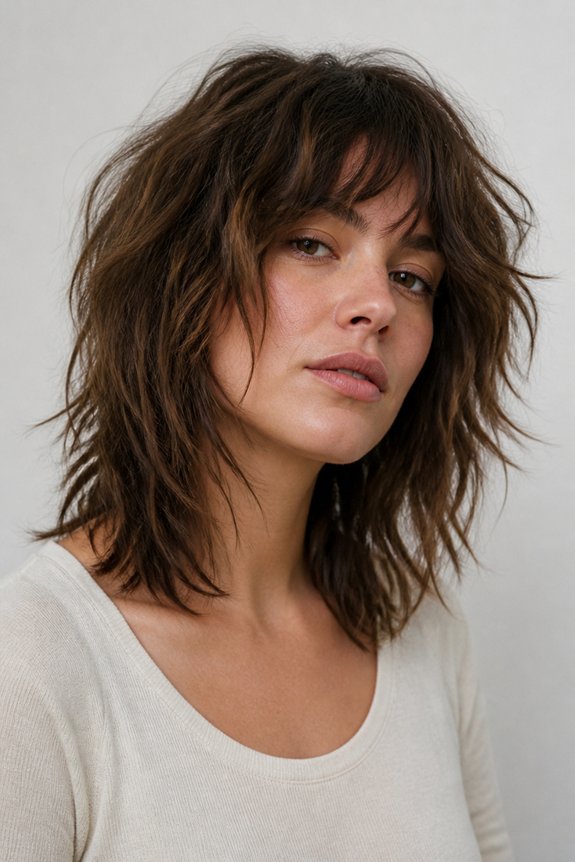
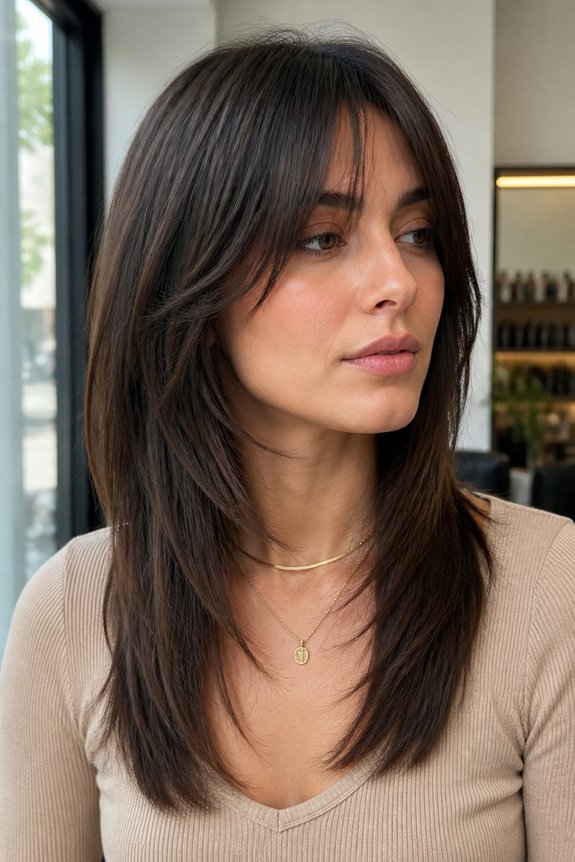
Running your fingers through a shag cut and feeling that perfect texture is what makes this style so satisfying. The real magic happens when you stop fighting the layers and start working with them instead.
It’s all about building movement through simple, intentional techniques. Texturizing sprays, sea salt products, and strategic braiding each create different kinds of dimension in your hair. The choice depends on the look you’re going for that day, whether you want more grip or softer waves.
Most styling experts swear that embracing a bit of intentional messiness beats chasing perfection every single time.
Your daily routine matters more than you might think when it comes to unlocking what your shag can really do. Small habits like scrunching your hair while it dries or loosely braiding it overnight compound into noticeably better results.
The cut’s full potential reveals itself gradually as you experiment with what works for your hair texture and lifestyle.
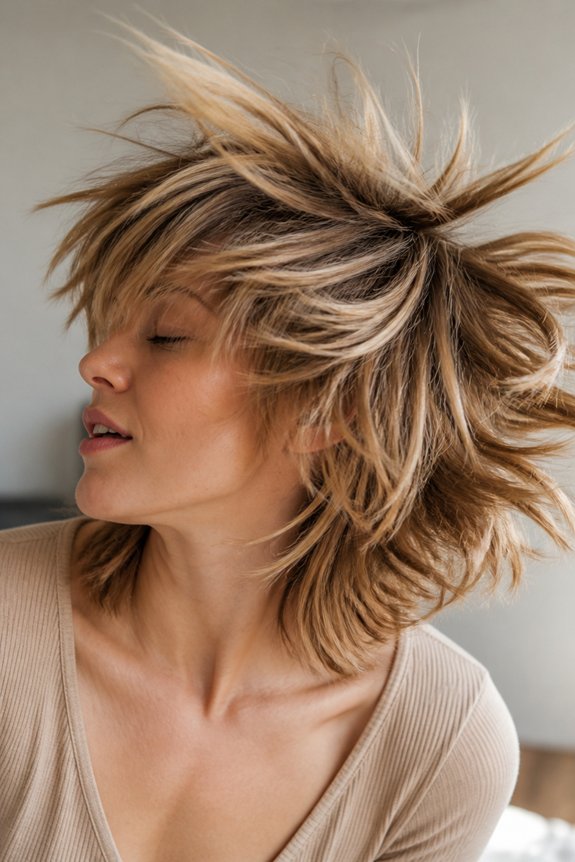
Master the Effortlessly Tousled Shag Look
Want that messy-but-make-it-fashion vibe? The tousled shag is all about texture and movement, so let’s build it step by step. Spray your damp hair with a lightweight texturizing product, concentrating on the mid-lengths and ends. This gives you grip without weighing everything down.
Grab your blow dryer with a diffuser and scrunch upward as you dry. Work through one section at a time so each part dries independently. This really brings out your natural waves and those choppy layers.
Once you’re dry, use your fingers to comb through and add a sea salt spray. This separates the layers and gives you that signature shag definition. Try a volumizing powder at your roots too. It instantly amps up the texture and dimension. The whole point is controlled chaos that looks intentional, not accidental.
Also read: 18 Chic Hairstyles for Women Over 50 With Glasses
Flip Your Head for Instant Movement
Want your shag to look voluminous and textured without much effort? A head flip is your secret weapon. Flip your head forward and let gravity work its magic on those layers. This separates each strand and creates lift right at the roots. Flip back up and you’ve got instant dimension.
Try applying a lightweight texturizing spray before you flip. This gives your hair better grip and helps the style hold longer. Work through your crown first, then your sides. This keeps the volume balanced all around your head.
The best part? This tousled look stays put for hours. It’s perfect when you’re rushing through your day. Just do a few flips whenever your shag starts to flatten, and you’ll keep that signature movement going strong.
Also read: 15 Choppy Stacked Funky Inverted Bob Ideas With Edge
Create Texture While Hair Is Wet
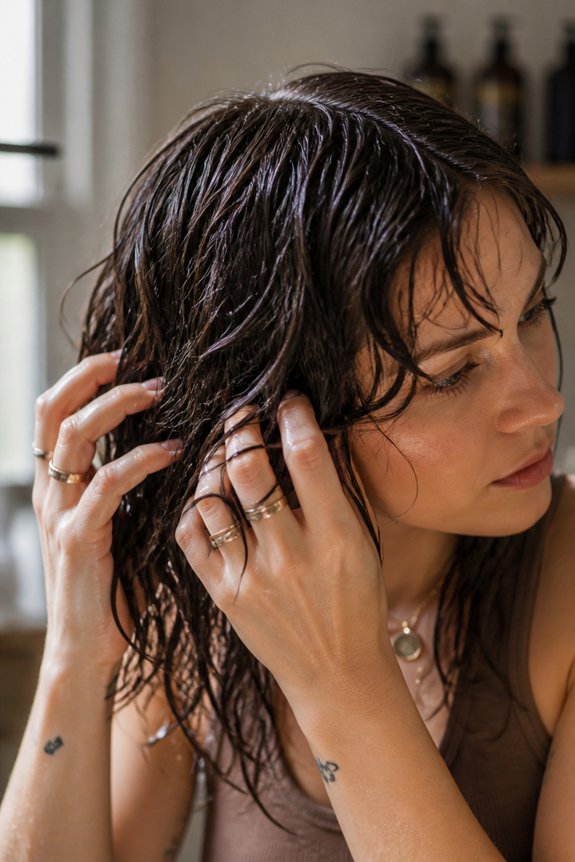
Want to build a shag that actually holds its shape? Start while your hair is still damp. Grab a texturizing spray or sea salt product and work it through your mid-lengths and ends with your fingers. This gives your layers grip and separation so they don’t clump together.
Now for the blow dryer. Use a diffuser attachment to spread the heat evenly and bring out your natural waves. As you dry, scrunch sections upward toward your roots to build volume. Tousle different areas as you go. The damp styling locks in movement before your hair fully sets, giving you that effortless, lived-in texture everyone loves.
Blow Dry Your Shag for Maximum Volume
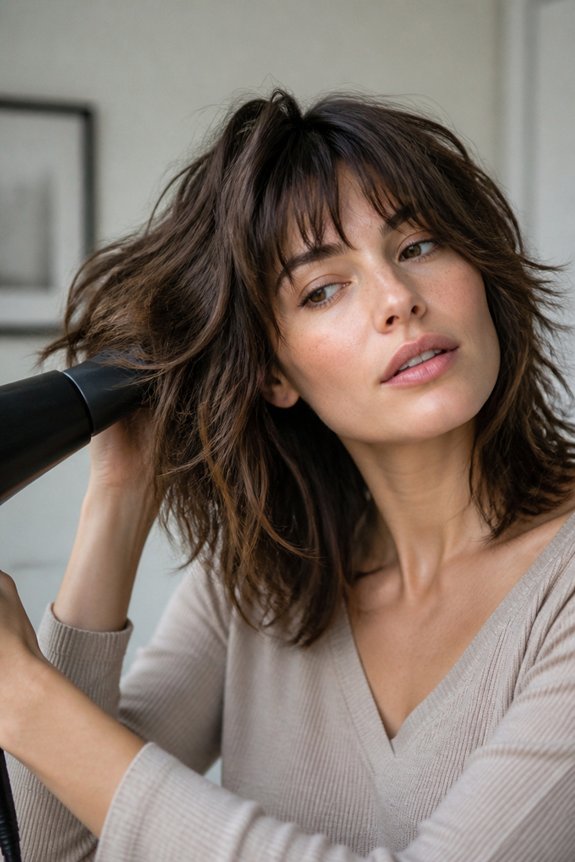
Want your shag to actually look like the photos? The secret is in how you dry it. Start by applying a lightweight mousse to your roots while your hair is still damp. This gives you lift without that greasy, flat feeling.
Grab a concentrator nozzle and set your dryer to medium heat. Point the airflow downward and work through your hair section by section, lifting each one away from your scalp. A round brush is your friend here, especially for smoothing out the mid-lengths while keeping those textured ends intact.
Once your hair is about 80 percent dry, spritz on a volumizing spray. This locks everything in place and kills frizz before it starts. Finish with a light hairspray that won’t flatten your layers.
Here’s the game-changer: flip your head upside down for your final few passes with the dryer. You’ll instantly get that full, bouncy crown that makes a shag actually look like a shag.
Add Texture With Sea Salt Spray
Want that beachy, tousled look without spending hours styling? Sea salt spray is your answer. It creates separation between your layers and brings out natural waves. Apply it to damp hair, concentrating on the mid-lengths and ends for best results.
Scrunch the product upward to activate the texture. A fine-mist bottle prevents you from oversaturating your hair. Bumble and bumble Surf Spray and SoilRX Sea Salt Texture Spray are solid choices that hold without feeling stiff or crunchy.
Layer the spray with your blow-dry routine for extra dimension. This combo gives you that effortless, professionally styled vibe that still looks naturally undone.
Curl Your Layers for Dimensional Waves

Want your shag to look bouncy and full instead of flat? Curling each layer is the move. Grab a 1.25-inch curling iron and work through your hair section by section, wrapping pieces away from your face. This creates real movement and depth that everyday waves just can’t match.
Before you curl, spray on a heat protectant like Olaplex Smoothing Thermal Spray. It keeps your hair safe while helping curls last longer. Try curling alternating sections in opposite directions for a natural, textured look.
Here’s the secret: don’t make every curl the same. Go tighter at the crown and looser toward the ends. This mix is what gives shags that effortless, dimensional vibe. Finish with a light hairspray that won’t weigh your curls down. Skip heavy products. You’ll end up with a style that feels textured and looks voluminous.
Straighten Your Shag for a Sleek Edge
Want that polished, runway-ready look? Straightening your shag is easier than you think. You’ll need a quality flat iron with ceramic plates so your hair stays healthy while you work.
Start at the roots and glide the iron downward in smooth, controlled motions. Give each section two to three passes for maximum shine. The key is patience—rushing creates visible breaks in the layers that ruin the effect.
Before you start, spray a heat protectant on your hair. Then apply a smoothing serum to damp hair before blow-drying. This step cuts down frizz and makes the final result look intentional and polished.
The payoff? You get modern sophistication with edge. Straightened shags look sharp for work or refined casual outings. Your cut’s natural movement stays intact while looking intentional and architectural.
Build Grip Between Wash Days With Dry Shampoo
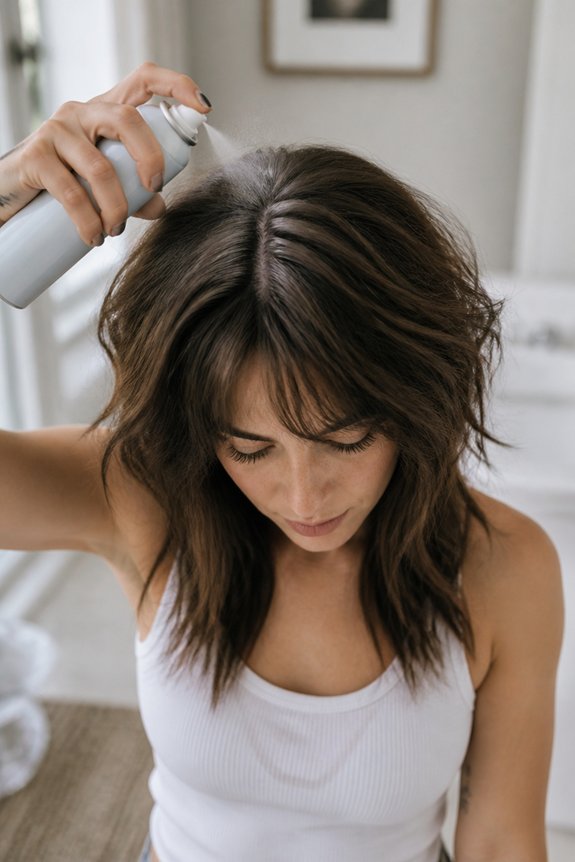
Your shag looks amazing right after styling, but by day two or three, it starts falling flat. That’s where dry shampoo becomes your best friend. It absorbs oil and adds texture back to your hair, so those sharp angles stay defined longer.
Apply dry shampoo to damp hair before blow-drying for the best results. Focus on the crown and underneath layers where your hair needs the most grip. Try Batiste or Bumble and bumble Pret-à-Powder if you want products that actually work. The friction from dry shampoo helps your curling tools hold the style better, keeping your shag looking intentional without extra effort between washes.
Tame Your Layers With a Half-Up Hold

Got shag layers but hate the frizz? A half-up style is your answer. You gather just the top section and let the bottom layers do their thing, giving you that polished look without feeling stiff.
Start with a lightweight texturizing spray on damp roots. This gives you grip so nothing slides around. Blow-dry while scrunching upward to bring out all that movement your cut has. Once it’s dry, section from temple to temple across the top of your head.
Grab a small elastic or claw clip and secure that top section loosely. The key is keeping it relaxed. Too tight and you lose the whole vibe of the shag. This balance lets your layers frame your face while staying controlled and put together.
Weave Braids Through Your Layers for Definition
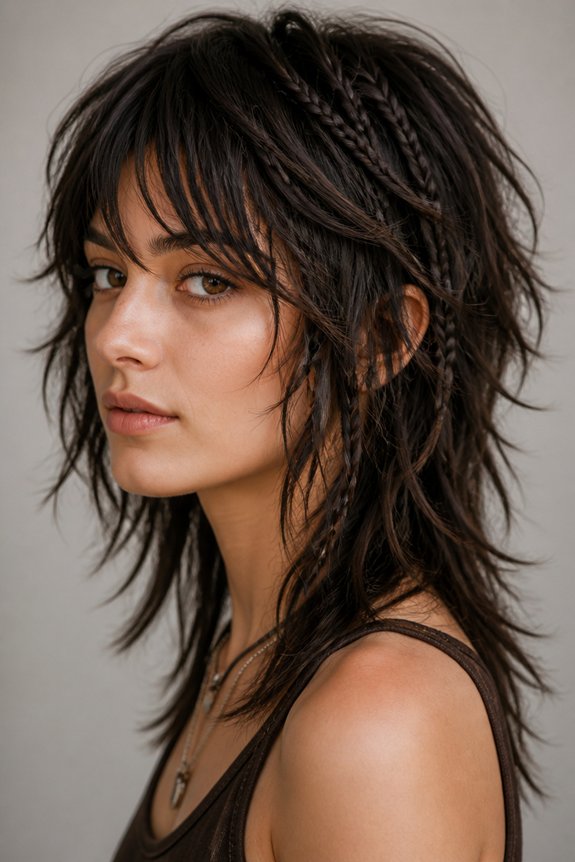
Want your shag to look intentional instead of messy? Braids are your answer. They anchor those choppy layers while keeping everything textured and dimensional. French or Dutch braids work best because they hold the cut’s natural movement without flattening your volume.
Here’s how to do it: Start at your crown and braid downward, picking up layers as you go. Use a sea salt spray beforehand to give your hair grip and separation. This makes braiding easier and keeps everything in place all day.
If French braids feel too structured, try a fishtail instead. It gives you that soft, romantic look while still defining your layers. Finish with bobby pins that match your hair color so they disappear into the braid. The final result feels effortlessly undone but totally put together.
Sleek It Back With Gel for Polished Shine

Want to make your shag look more put-together? Gel is your secret weapon. Apply it to damp hair and comb through each layer carefully. This tames the textured look while keeping dimension at the ends.
Grab a strong-hold gel and work it through your mid-lengths and tips with a fine-tooth comb. Push your hair back from your face to create smooth definition along your crown and sides. Blow-dry while combing backward to set everything in place. The result works for the office or a casual day out, and you still keep that shag movement you love.
Add Edge With Strategic Clips and Bobby Pins
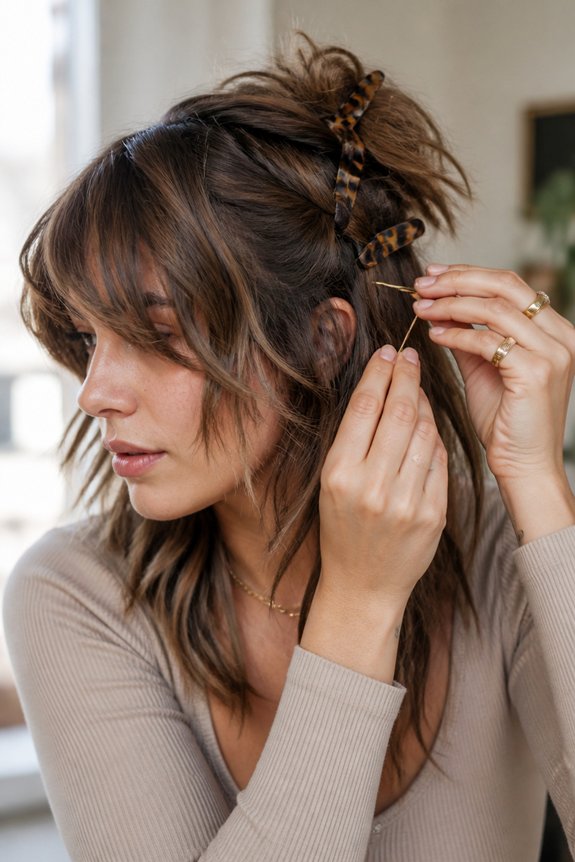
Want your shag to look polished instead of bedhead? Clips and bobby pins are your secret weapon. They add dimension and movement while keeping that effortless vibe you’re after.
Start with small tortoiseshell clips at your crown. They instantly lift your hair and add height where you need it most. Bobby pins work best securing those face-framing layers, and you can keep them slightly visible near your face for a subtle metallic accent.
Try pinning back your shorter pieces to show off the longer sections underneath. This reveals the actual architecture of your cut and creates real texture. Claw clips give you a bolder look if you position them asymmetrically across your head.
Change up your pin placement every day. This prevents creases from forming and keeps your styling options fresh throughout the week. Pearl-finish bobby pins work beautifully for evening looks when you want something more refined.
Also Read: 15 Stacked Bob Haircut Ideas With Shape and Volume
Refresh Your Shag Between Wash Days

Your shag looks best right after styling, but what about day three or four? Dry shampoo is your secret weapon. It soaks up oil at the roots and keeps that volume looking fresh. Try Batiste or Bumble and bumble if you want products that actually work without needing water.
Between washes, texture spray becomes your best friend. Spray it on your mid-lengths and ends to bring back that piece-y, layered vibe. A sea salt spray does the same thing and gives you that effortless, tousled feel.
Here’s the key: use your fingers, not a brush. Running product through your hair with your hands keeps the texture intact and prevents it from getting flat. This simple step keeps your shag looking intentional and full of movement with barely any effort.
Frequently Asked Questions
How Often Should I Get My Shag Haircut Trimmed to Maintain Its Shape?
A shag haircut typically requires trimming every 4 to 6 weeks to maintain its layered shape and texture. Regular trims prevent the style from becoming too long and losing its signature choppy, voluminous appearance that defines the cut.
What Face Shapes Look Best With a Shag Haircut Style?
Shag haircuts complement most face shapes effectively. Oval and heart-shaped faces wear them particularly well, as the layered texture adds dimension. Square faces benefit from softened angles, while round faces gain flattering length through the style’s movement and volume.
Can I Style a Shag Haircut if I Have Thin or Fine Hair?
Can thin hair pull off a shag? Absolutely. One must use volumizing products, blow-dry with a round brush, and ask stylists for shorter layers that prevent heaviness. Texturizing sprays and strategic styling create dimension without sacrificing delicate strands.
Which Products Work Best for Holding a Shag Without Looking Greasy?
Lightweight texturizing sprays and matte-finish pomades work best for shags with fine hair, providing hold without heaviness. Dry shampoo and sea salt sprays add grip while maintaining a natural, non-greasy appearance throughout the day.
How Do I Prevent My Shag Layers From Becoming Too Frizzy and Unruly?
Like a wildflower garden needing gentle tending, shag layers require strategic care. One should apply leave-in conditioner to damp hair, use a diffuser when blow-drying, and incorporate anti-frizz serums. Regular trims every six weeks maintain layer definition and reduce flyaways.
Conclusion
A shag haircut is like a blank canvas waiting for personal expression. The styling techniques outlined transform this versatile cut into countless looks, from tousled and undone to polished and refined. By mastering texturizing sprays, strategic layering, and intentional styling choices, anyone can reveal their shag’s full potential. The key lies in experimentation—finding which methods work best for individual hair texture and lifestyle needs.