Table of Contents
Introduction: Master the Blowout Technique and Ditch the Salon Visits
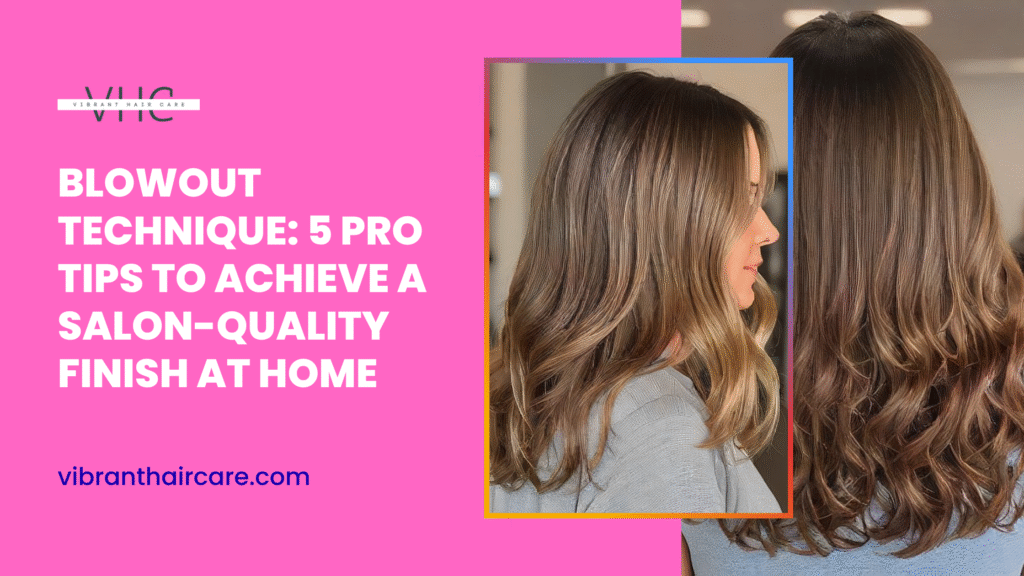
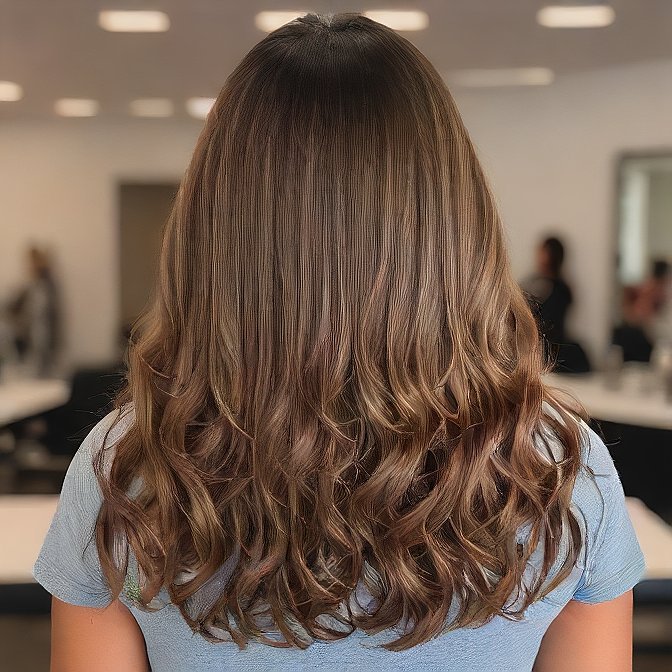
There are not too many hair treatments that are more luxurious and will make you feel good about yourself than a professional blowout. Well-done blowout out with smooth texture, sleek strands, and bouncy, just-right-amount takes a new form at a glance. The secret is that you do not necessarily have to spend your time at a weekly salon to achieve those results. With the techniques to blow out your hair learned at home, it is possible to get the same sleek look-just whenever you fancy it.
And the money that could be spent at the salon will not only be saved because of the knowledge that you received, but also because now you can just choose to do your hair however you please, and you will not be dictated by scheduling. There is no, yet again it is waiting for appointments, running to the salon at the time of a big event.
In this tutorial, you will find 5 professional-level secrets to achieving that professional, swoosh-y blowout. Whether it is prepping your hair up or utilizing the correct equipment and executing essential movements, these strategies will take your hair to the next level on a permanent basis.
1. Prep Like a Pro: The Foundation of Every Great Blowout
An impeccable blowout begins before you put your hair in the dryer. Getting it prepared right will determine a carefree, volume-packing finish that will really go the distance.
Use towel-dried hair that has been cleaned of products or oil; this can cause your hair to be heavy and not allow volume to build. Dry your hair with a towel after bath so that it is not very moisturized, but do not rub it hard, as this gives rise to frizz. Do not have your hair too wet.
Then use a heat protectant. This is one of the indispensable steps in every blowout technique. Heat protectants will save your strands against heat, keep them moisturized, and prevent breakage. For volume, apply a volumizing mousse, root pick-up, or thickening spray to still-wet hair.
The last (and, also, the most ignored) secret to a successful blow-dry is sectioning. Part your hair into 4 or 6 portions according to its thickness. Fix every part using some clips. By sectioning in smaller parts, there is more control and even heat distribution that leaves fewer flyaways and makes the style last longer.
Check Out: Volumizing Tricks: 4 Powerful Secrets to Make Flat Hair Look Fuller.
2. Choose the Right Tools: Brush, Dryer & Nozzle Matter
There is no secret weapon that will allow you to create salon-quality results with non-salon-quality tools (or at least non-salon-quality results), tools that do the job.
Use your round brush first. The dimension and the nature count:
- The biggest round brushes (2+ inches) work best to add volume and blow out long hair.
- Larger brushes (1-1.5 inches) assist in making looser curls or flips, especially at the hair ends or the face.
- Blocking tension provided by ceramic and boar bristle brushes is smooth, resists frizz, and is used to dispense natural oils to give additional shine.
Then there is your hair dryer, not all of them are made equal. Try to find the one that has various heat settings, a cool shot button, and ionic technology to make your hair dry quicker and with frizz reduced.
And how could we use the nozzle attachment, a small-focusing concentrator, to help you beam the air quite where it’s wanted. This is what makes the styling beneficial as it is facilitated with easy-flow, smooth and controlled styling, and to some extent, frizz is prevented by sealing the hair cuticle. No nozzle? No control. It is so easy.
The investment in the proper instruments might look like a luxury in the short-term perspective, but they will help you upgrade your at-home blowout and save you thousands of visits to the salon in the long-term perspective.
3. The Tension Trick: Stretch & Smooth Each Strand
In case your blowouts lack oomph or frizz out too soon, you probably are missing the most significant styling rule of all – the tension. Generating the optimal amount of pull as you dry your hair is what causes the tip of each strand to smooth and close the cuticle, as well as transform your hair into a durable end result.
Why tension is important: When the hair is taut, as we blow-dry the hair, we dry it in a more upright, straight style. It also makes it less puffy and frizzy since the hair shaft is flatter, retaining the shine and structure.
Rolling vs. dragging—know the difference:
- When you need curled-under ends or crown bod, you use a rolling stroke with your round brush.
Mistakes to avoid:
- Do not hold the dryer just over the hair; otherwise, it leaves moisture all in rather than inviting frizz.
- Do not overheat any recession. When smelling burning or feeling a lot of heat, you are burning your hair. Continue rolling the dryer and ensure the setting of medium to low heat.
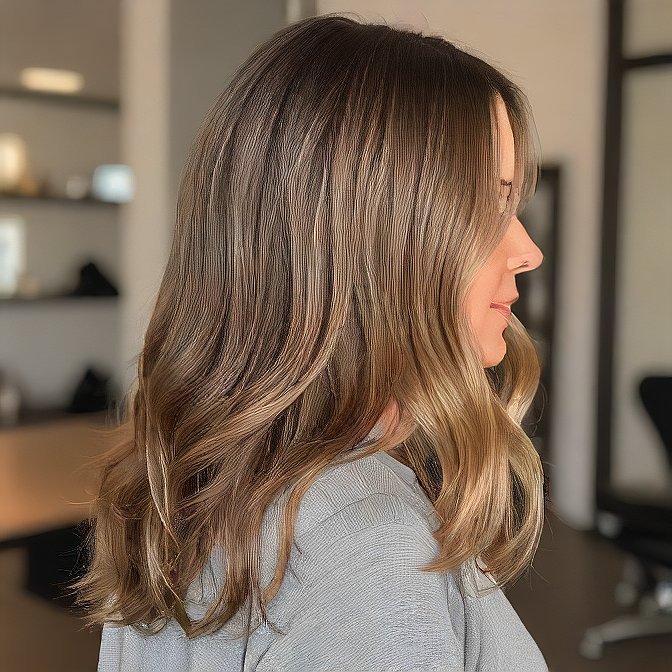
4. Direction Is Everything: Root Lift to Polished Ends
Learning to use the blowout technique, it is all about the direction in which your air is going and the direction in which you brush your hair, which will either break or make your ultimate outcome.
Blow-dry against your roots, yes, against. This includes pulling down the pieces and pointing the dryer at the scalp downwards. This will immediately increase volume and lift where the hair normally goes flat.
For your mid-lengths and ends, choose your style:
- Need what, curly bouncy hair or flipped ends? Spread the brush or roll it under, rotating.
- Would you rather like a smooth look? Tensionally pull down and use the ends wrapped around smooth in brush surroundings so as to avoid kinks.
Pro Tip: Make sure that you use your dryer always behind your brush, moving in the same direction (roots to ends). This smooths the cuticle, limits flyaways, and makes it look more natural.
5. Cool It Down: Lock In Style with a Final Blast
You have already done all the work; you should lock it in. Your dryer has a cool shot button that is not optional. It is the last certification of your blowout.
Importance of cool air: Hot air raises the hair cuticle, and you can mold the look. The cuticle is sealed with cool air and holds the hair firmly in place and makes it looks smooth and glassy all day.
Usage: Once you are done with each part, spray it with a cool air blow and keep the form using your brush or hand in 5 to 10 seconds. It holds the style in position and assists in the avoidance of a washed-out look in case of high humidity.
Bonus Tip: Once you cool down, spray on light finishing products such as shine spray, an anti-frizz serum, or a dry texture spray to smooth things out. Do not use heavy oils or creams that would crush your effort.
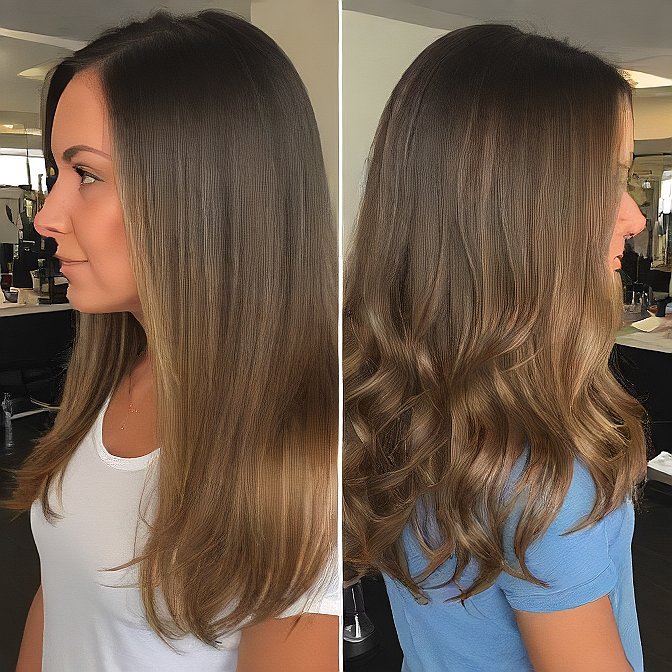
Conclusion: Turn Every Wash Day into a Salon Day
The optimum blowout is no longer the only product of the salon with the proper measures in place. With the learning of the blowout at home, your hair will be that like silky frizz-free plump each time you wash your hair.
Here too quickly, go back over the 5 professional blowout secrets that will make your styling sessions a blast:
- Get ready like a pro with dry and toweled hair and the correct products
- Find the right kit, brush to blow dryer and nozzle
- Gently fix all the strands to better and comb them out
- Control of the lift of roots and polished movement
- It should be finished with light styling products cemented with cool air
The secret behind it? Routine and innovation. Doing it a couple of times may help you set the rhythm that will suit your hair length, texture, and style. However, after doing it, you will wonder what was it that ever made you go to a salon to get a blowout.
For more info: Click Here.
FAQs About Blowout Technique
Q1. What is the duration of a home blowout?
Absolutely. The blowouts are fantastic at curly and textured hair especially when prepared with smoothing serum and detangling sprays. Apply with paddle or round brush and in little areas at a time.
Q2. Is it possible to do blow out on curly or textured hair?
Far far away, behind the word mountains, far from the countries Vokalia and Consonantia, there live the blind texts. Separated they live in Bookmarksgrove right at the coast of the Semantics, a large language ocean.
Q3. What should be the optimal size of the brush according to the length of hair?
- Short hair: round brush 1-1.5 inch
- Medium (1.5 2 inch round brush)
- Long hair: use 2+ inch brush to bulk and flow
Use ceramic or boar bristle brushes to get a smoother outcome.